| Vertex
Examples and Methods
So
recapping, click the object you need to shape, and click
the vertex tool
Now
theres 3 modes, if you click it once you'll get the dots
appear like the image in the right fig1.0
Now
you can see yellow dots and white dots, (ive taken the picture
from the front view btw, but it looks the same in the other
views as well at the moment) the white dots you will notice
are all on the corners, the yellow dots are in the middle,
so moving a white dot will move that corner, if you move
a yellow dot the whole side will move. As you can see in
fig1.1 ive moved the corner over one unit. The other views
will change as well once you click the arrow the vertex
dots will go off and you have completed the vertex for that
shape.
Now if you keep you shapes nice and aligned and use common
sense you can make many varieties of shapes. If you are
unsure if your shape is ok, use the check map for problems
facility in the toolbar under "map". fig 1.2
As
I have said there is 3 modes, although you can still perform
the same vertexes in any of the modes, so it is not important
which mode your in, just clicking the vertex tool once will
work just fine, other vertex modes can make things easier
to see, say if you click the tool twice you only get white
dots for moving corners.
Incorrect Shapes
So
what about incorrect shapes? well it can be explained, but
its a little hard to understand to explain every single
possible incorrect shape. One thing to remember is, if you
have say a square it can only have 4 sides in front view,
making another face on one face would make it have 5 faces,
which is no good, this is only caused when reverting to
a square from a previously vertexed shape.
Other
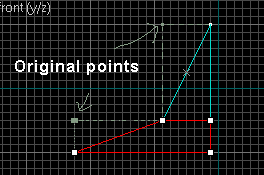
errors include faces "seeing" into others, which
is a no go area, like in fig 1.3 you can see the shape was
previous a square, and the top left corner has been brought
down into the shape creating face errors.
Thats
not to say you couldn't make this shape, you can make it
with vertex, however it has to be 2 objects, see if you
can look at the picture (fig1.3)and imagine it as 2 separate
blocks and how you could make it up.
If you now look at fig 1.4, you can see how to make a similar
object to that one above, that would be acceptable and not
give errors, as you can see ive left the dots on the bottom
shape there, and used mode 2, which makes no difference
apart from its easy to see what your doing.
|


FIG 1

FIG 1.1

FIG 1.2

FIG 1.3

FIG 1.4 |

